
Passive house air sealing & window installation - part 2.

Workshop models showing interior and exterior air sealing tapes in place.
PART 2 - INTERIOR AND EXTERIOR WINDOW SEALING
Part 2 of the workshop walked us through, step-by-step, how to window seal the interior and exterior of an installed window. For our class, we used a flush, non-flanged window model. See the SIGA guide link at the end of this post for other window installation types.
Interior Window Seal
Step 1: Make four corner “boot” pieces:
First, we cut four 5” long pieces of SIGA Fentrim tape used for the permanent secure sealing of component joints.
Then we folded one edge of the the tape up, lengthwise, along the inside of the 1/2” release strip.
We then made a cut across the folded 1/2” depth right in the middle of the tape.
Next we folded the large uncut depth of the piece in half.
We removed the adhesive release strip from one side of the 1/2” portion, folded it on top of the other side and stuck it to the other 1/2“ inside corner. Hey, we made corner boots!
Step 2: Install two corner boots at the window frame sill:
Taking two of the corner boots, we removed the remaining adhesive release strips, placed the boot up against the window frame and inside corner of the rough sill and jamb. Note: overlap of the frame depends on how much your finish trim and wall will overlap the window frame.
We then pressed the tape in place with a burnisher, making sure to have no wrinkles or air-gaps.
Step 3: Seal the window frame sill and jambs
First, we cut pieces of Fentrim the length of the rough opening jambs and sill.
Releasing one side of the adhesive strip we stuck it to the window frame, and then to the rough opening. It was suggested that the tape should be pressed in a bit along the gap between frame and R.O. to allow for some growth of low-expanding foam later in the install process.
Don’t forget to burnish to activate the pressure-sensitive adhesive!
Step 4: Install two corner boots at the window frame head:
Taking the other two corner boots, we removed the remaining adhesive release strips, placed the boot up against the head of the window frame and rough head and jamb.
We then pressed in place with a burnisher.
Step 5: Seal the window frame head
Similar to sealing the window frame sill and jambs in Step 3.

Application of the interior window seal tapes.
Insulating Around the Window
While not demonstrated in this workshop, it was suggested that low-expanding foam or tape should be applied to fill any gaps around the window frame and rough opening after the interior window seal was completed.
Exterior Window Seal
Step 1: Sealing the exterior window sill:
Depending both the window type and maker, a sill can be taped or left open for drainage (and sealed with the interior tapes already covered). Check with the window manufacturer for the appropriate approach. For this demonstration, we taped the sill.
First, we cut a piece of SIGA Fentrim 430 gray about 2” wider than the prepared rough opening.
We then removed one backing paper and applied to the window frame bottom.
Next, we removed the second backing paper and stuck it to the R.O. and used a burnisher to press firmly in place.
Step 2: Sealing the exterior window jambs:
Cut 2” longer than the jamb opening and apply like in Step 1.
Step 3: Sealing the exterior window head:
We cut a piece of Fentrim 430 gray about 4” wider than the head opening and applied like in Step 1.
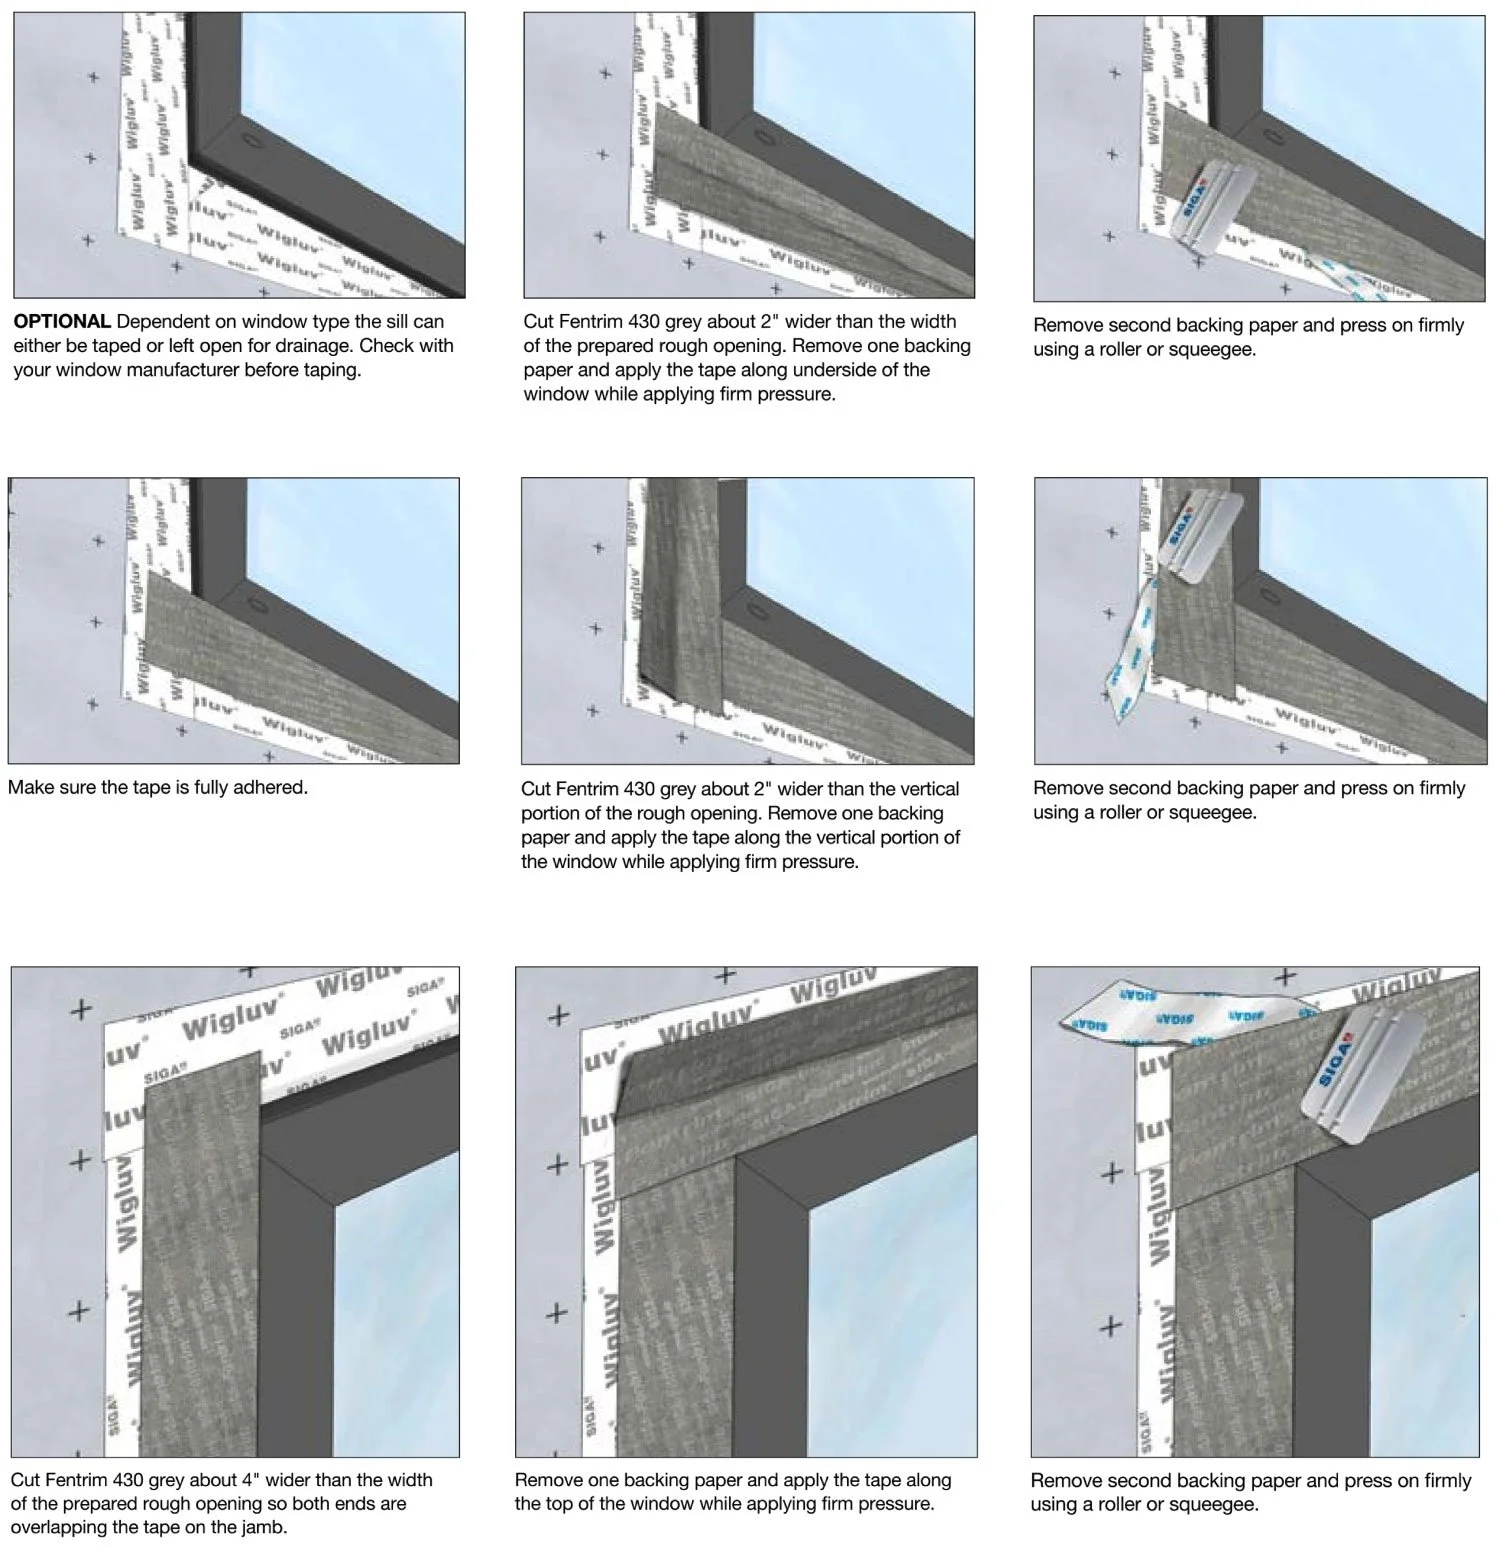
Application of the exterior window seal tapes on a flush, non-flange window type.
Hey, we finished a passive house window installation! It felt good to walk through it once with all the experts in the room so we could ask questions.
For an illustrated guide of what was discussed above, along with instructions for other types of window flashings, check out this helpful step-by-step guide from SIGA.