
Passive house air sealing & window installation - part 1.
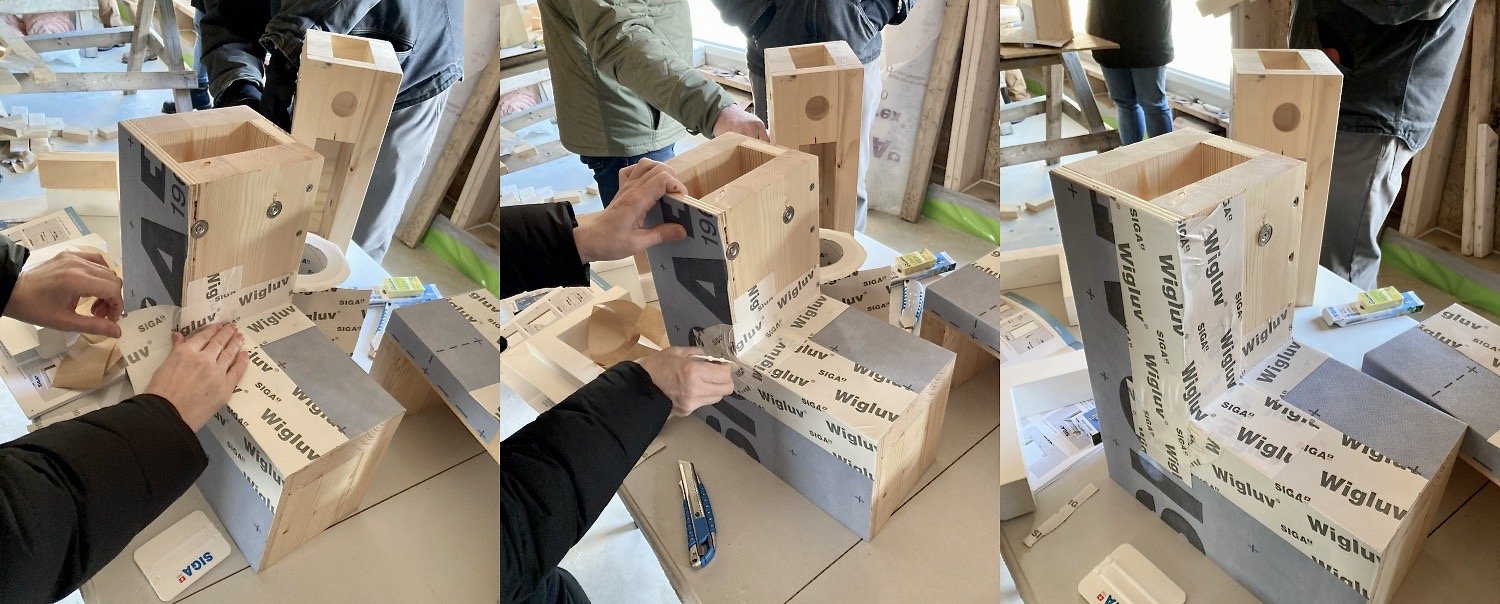
Photo showing the application of air sealing membranes and rough sill tapes.
PART 1 - AIR SEALING THE FACADE AND WINDOW ROUGH OPENINGS
We both got our utility knives out at an excellent local workshop demonstration on how to air-seal a passive house building envelope and install a passive house window. This free event was held at the construction site of Bright Haus #1, the first affordable certified Passive House home in Minneapolis (see link at end of post). The event was co-hosted by JPs Remodeling, Greater Metropolitan Housing Corporation, SIGA, Heritage Window Company and TE Studio Passive House Design.
Air-sealing is an important step in passive house construction, as one of the key tenants of passive house is maintaining an air-tight envelope so that there is minimal heat-loss.
With attendees at individual work stations featuring clever wall and window demonstration mockups, our instructor walked us through the application of SIGA high-performance membranes and tapes. What follows is our recounting of the step-by-step process to air seal the house envelope and install a passive house window:
Air sealing the passive house facade
We first removed the adhesive side backer paper from the SIGA Majvest, a self-adhering, vapor permeable facade membrane with pressure-sensitive adhesive. We then applied the membrane over our wall and rough opening.
Once in place, we then used utility knives to cut out the opening along the head and jamb.
Next, we folded in the cut-out membrane flap at the sill and cut the excess off flush with the interior sill.
Finally, we secured the membrane using a flat burnishing tool to press down and activate the pressure-sensitive adhesive backing.

Application of the vapor permeable membrane to the exterior facade.
Exterior treatment for window rough opening s
Step 1: Wrapping the rough sill:
First, we cut a length of SIGA Wigluv tape 4” wider than the rough opening so it will hang 2” past the jamb on each side. Wigluv is a diffusible and rainproof high-performance adhesive tape for permanent wind-tight bonding of exterior components.
Next we creased the tape along the split backing, removed the lower backing strip and applied it to the exterior face of the sill with 2” hanging past each side of the rough opening.
Now, with the upper loose side of the tape folded over away from the wall, we cut slits along the crease from each edge of the rough opening to the end of the tape using a utility knife. We folded the two loose flaps toward the inside of the R.O.
We then folded the tape over, onto the top of the sill, removed the second backing strip and stuck it down using the burnisher tool.
Step 2: Wrapping the rough sill corners:
Now, we cut two gussets out of Wigluv 100 that are 3” longer than the depth of the rough sill.
We then creased and folded the tape lengthwise and placed the folded gusset into the corner
Next, we removed the sill facing backing strip and pressed the tape down onto the sill.
Then we removed the jamb facing backing strip and pressed the tape into the jamb.
Lastly, we pulled the overhanging tape down and around the exterior corner and fixed it all with the burnisher tool.

Wrapping a rough sill and sill corners.
Step 3: Wrapping the rough jambs:
Cut Wigluv 4” longer than the rough jamb (extends 1.5” above the head and 2.5” below the sill).
These are applied just like the sill tape in Step 1, but vertically.
Step 4: Wrapping the rough head corners:
These head corners are applied just like those in Step 2.
Step 5: Wrapping the rough head:
First, we cut a piece of Wigluv that was 6” longer than the width of the rough head (3” overhang on each side).
The head tape is applied just like the sill tape in Step 1.
The rough sill is now ready for the installation of your passive house window!
It is important to make sure that water will shed and that there are no air-gaps. For an illustrated guide of what was discussed above, along with instructions for other types of window flashings, check out this helpful step-by-step guide from SIGA.
And a link to explore Bright Haus #1, the first affordable certified Passive House home in Minneapolis.